 Hello! I'm back...sort of....this is a very quick...down and dirty tutorial...what could I do if I had more than 15 minutes to blog?
How can life be such a whirlwind? I don't want to bore you with the details of how few hours there are in a day to do everything...mostly because I know that everyone I know, and probably you too, wishes and dreams of more hours, more quiet hours, to leisurely finish everything that is on our plates. So, I have a little art project....but because I didn't get to let it percolate very long...the application of how far to take it can be left to the reader's creative imagination. I suppose as I leave to go on a weekend quilting retreat, I'll be able to think of hundreds of different ways to use this project. Thankfully, I can leave that for another day.
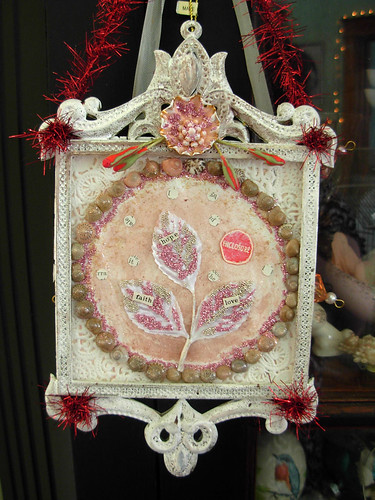
Here is my project Begin with assorted paper punches, colored pencils, and frosted, ruffed up shrink plastic.
Lightly color the rough side of the plastic and punch a small hole in the middle. I use my embossing heat tool and a baking pan to shrink the plastic...hold it lightly with the pointy end of a small paint brush.
 Heat and shrink until flat...quickly, while still hot, pinch and form into a teeny, tiny, flower.
 Mold a little or a lot. I tried with both the shiny part and the rough part showing.
I have purposely saved the little stamens that are part of vintage posies... knowing I'd use them sometime...this is the time. I've pushed them up through the little hole and I love them!
The next thing is to find some little leaves, put all together and wrap with floral tape. Add some vintage seam binding, a bow and decorate.
 Forgive me if I've made a mistake or forgotten a step...because I've been sick...all of life got piled up in one day....have fun and best wishes!
2.26.2010
Artful Thurday Round 8 - Faux Lucite Posies
2.19.2010
Petite Cake Box at Artist Class
 Today is the post for my Petite Best Wishes Cake Box Tutorial at Mary Green's Artist Class. It is never too late to join...all the tutorials are available to download when you join Artist Class. I'm super thrilled to be amongst all the wonderfully talented artists whose projects are fun and educational...and you end up with lot of great art!! Consider joining...if you are interested, see the link to the right...and receive $10 off with the code: thisgoodday.
 Thank you to everyone who left a comment wishing for me to recover from the winter sickness that hit. The last time I remember being sick like this was 1999...so I'm grateful to be pretty hearty in health. But this one knocked me...when I finally went to the doc, I had myself a sinus infection, bronchitis and a touch of pneumonia. Whew!!! So, I'm sorry about the second week of no Artful Thursday post...and I am finally feeling better! :)
Hope you'll hang in there with me, and if you have been under the weather, my thoughts are for the return of your good health as well! See you soon...
2.12.2010
Artful Thursdays...I'll Be Back
So sorry...I've fallen prey to the winter illnesses...I couldn't even scrounge up the energy to think of a project :) But, I'm convinced that it will be over soon and I'll be good as gold and back to "normal." Hah! Normal? That's what my friends would say... :)
See you soon, take care.
2.07.2010
My Etsy Treasury - Eternal Spring
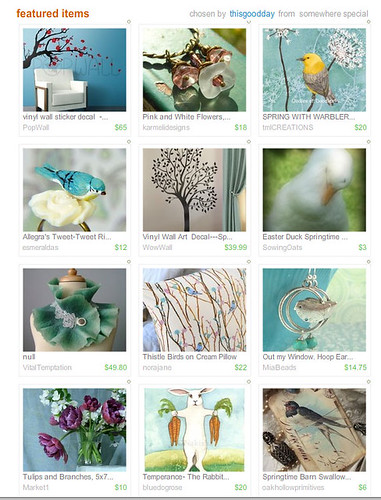
Once in a while I get really lucky and get a spot for an Etsy Treasury. I hope you'll take a look here and perhaps even leave a comment! Happy Sunday!
2.04.2010
Artful Thursday - Super Easy Luxe Candle
 One thing I love about all the great products on the market for artists is that for pennies, I can create lovely home decor items for just a fraction of the prices I see elsewhere. And even better, if I'm in a tight spot...like having to get a gift on the spur-of-the-moment, this beautiful candle is one I fall back on many times. It is easy, and when finished, I think rather pretty.
For the base I've used several different things...I've used an old jelly jar; I've used a juice glass, and today, I used a plain glass candle holder I found at the local dollar store.
Supplies:
computer generated artwork
clear sticker paper for ink jet printers
embellishments
battery powered tea light
If you are computer savvy, then you can begin there. I measured the circumference of the glass with a piece of ribbon, and opened a new document with those dimensions. I chose several pieces of past digital collages I have done, and put them together to fit the glass, keeping in mind that the sticker paper is clear. You could also take a collage you've made to fit the same dimensions and have it printed on the clear sticker paper at your local photocopy store. Then, carefully peel just a bit of the paper from the back and begin to place on the glass. Usually I will clean the glass and then wipe with alcohol to remove any natural oil that may have transferred onto the glass from my hands. Carefully, burnish the air bubbles out and make sure there are no wrinkles in the sticker on the glass before moving on to removing more paper. Continue until all the sticker is burnished on the glass. Then I think the fun and play can really begin as you embellish to your heart's content.
 One of my favorite parts is putting the little tea light in the candle holder and turning it on. Then you can really see the prettiness of the sheer design.
2.01.2010
Goodbyes and Hellos

 To be among the first group of artists to fill the "Lollishop Design Team" slot was a true honor for me. It is such a boost in all aspects to be associated with such a group. Thank you so much, Sadie Lou, for allowing me that opportunity...and thanks to everyone who stopped by to see what each of us on the Design Team created for that month. It is so fitting, I think, that we go out in the season of love and hugs and kisses...which are my sentiments for this lovely world of art and artists.
 But, it is time to say hello to a new group, new blood, new art - as the Spring Lollishop Design Team gears up for its for reveal. But before that happens, here is my last offering for you all. A crepe ornament I snapped up from my local scrapbook store with the thoughts of embellishing it for my last reveal.
Don't forget to stop by the Lollishop Blog, as Sadie always has some fun up her sleeve.
1.22.2010
Artful Thursday - Clearance Ornament Do-Over
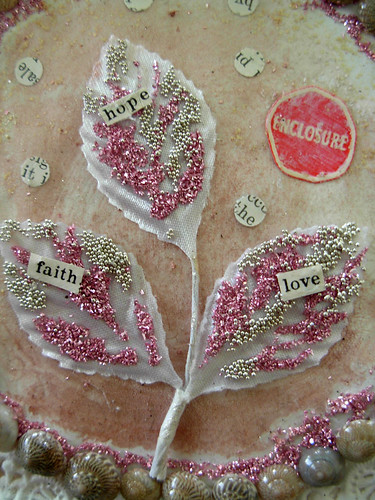
Welcome to week 3 of Artful Thursdays!
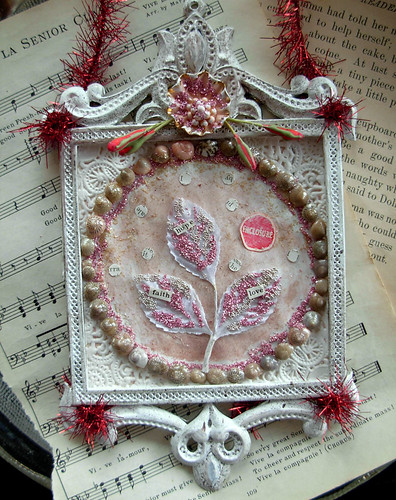

 Here is the frame I was after when I was finished prying apart the pieces...
 Now the fun can begin!
Artful Thursday Interruption!!!
EDIT: Okay, I'm back on track. Since one of Julie's comments on her original post was about "using it or sending it on it's way..." I've been faithfully committed to using up supplies that I have on hand...this could take forever!
The first thing I did was to take off the fake silver shine of the plastic ornament by brushing on white gesso. It sticks to many smooth surfaces and I like the way it almost instantly ages the plastic. With a bunch o'stuff, I just played...auditioned, took plain white flowers and glittered them up...buttons, earrings, ink, some Stickles, and one of my favorite items to create with, seashells.
I'm always looking for ways to recycle items to fit my aesthetic. Sometimes it takes a while to see what it "could" be, but half the fun is in the brainstorming.
Here's hoping you'll be able to sneak some time to live artfully!